Showing posts with label Paper Doll. Show all posts

Friday, June 10, 2016

Ships Ahoy Blog Hop


Welcome to the 
Ships Ahoy Blog Hop

Thank you for joining us as we set sail for a hop full of nautical fun!

You should have sailed in from ( JANET  ) Blog. If not, the Captain, Connie Can Crop is the first stop in this hop. This is a one day blog hop and we appreciate your leaving a comment for all of these amazing crafters.

We have a WONDERFUL sponsor this month!!


One lucky winner will win their choice of 3 files from their shop! 
Be sure to check out their shop online HERE
Visit them on facebook HERE
What do you need to do to win? Easy... become  a follower of each of the fabulous blogs in this hop and leave each of them a comment letting them know what you like best about their projects.
You will have until 10 pm Sunday to finish the hop and leave your comments.
Winner will be announced on Wednesday 6/22/16 at Connie Can Crop.
Be sure to follow everyone and leave a comment along the way!

Raise those anchors and batten down the hatches as we embark on this great adventure! All aboard!

"Put a Boat on It"

When Connie set up this blog hop, she stated that our projects should have a boat on it - mine does but it's "way different" than the traditional concept of a boat project.  For several months I have been making straw people for a display at our local library.  These have been stamped people such as Julie Nutting or Dyan Reaveley dolls and the occasional story book character.  This is the case for today's project -
Marie Antoinette straw person.

I colored her with a combination of colored pencils and alcohol-based markers, fussy cut her out, and mounted her onto a decorative straw.  She and the other straw people I've made will serve as a decorative centerpiece for a summer reading display.


 Up next is MIRANDA

Here's our line up in case you get lost.


Photobucket

Sunday, October 19, 2014

Welcome to the Monster Mash Blog Hop Day #2


I was working in the lab, late one night
When my eyes beheld an eerie sight
For my monster from his slab, began to rise
And suddenly to my surprise
He did the mash, he did the monster mash
It was a graveyard smash!

Connie Can Crop and her ghoulishly wonderful friends are so glad you could join us for this Monster Mash! We have so many frightful projects you'll be screaming for more! 

This is day #2 of the blog hop and we appreciate your leaving a comment for all of these talented creatures who are here sharing their ideas and creations. We are thrilled to death that you came back!
The zombies were having fun, the party had just begun
The guests included Wolf Man, Dracula and his son!
A Woooo!

We have three terrifying yet amazing sponsors and giveaways for this hop!


Creative Kuts is giving one lucky winner a $10 gift certificate for their online store.
Be sure to check out their spooky SVG files!

You can visit her Shop here and
follow them on Facebook here.

AND

is giving away this Frightfully Fun Stamp set from CTMH


AND
Connie Wallenbrock is giving away this Mini-Medley Accents Pack from CTMH
Perfect for your Halloween creations!


What do you need to do to win? Easy... become a follower of each of the fabulous blogs in this hop and leave each of them a comment letting them know what you like best about their projects.

Then you can mash, then you can monster mash
The monster mash, and do a graveyard smash
Then you can mash, you'll catch on in a flash
Then you can mash, then you can monster mash
You will have until 12:00 am Monday to finish the hop and leave your comments.

Winners will be announced on Wednesday at Connie Can Crop.

Be sure to follow everyone and leave your spirited comments along the way!

Let's get this Monster Party started!

Mama LoveBug here to share my monsters with you - I know that mermaids can be beautiful sea creatures with all kinds of positive vibes, but I decided to make up two who could be a bit naughty for Halloween scaring.


Recipe for Mermaid-Monster Tags
*LoveBug Creations Rumple Ribbon and Mama's Mesh
*Julie Nutting Doll Stamp and Sentiment - mermaid, stamped, paper-pieced, fussy cut
*Dyan Revealey Dylusions Arrow Stamp
*Paper from my stash and some other sentiment stamps from my collection
*Viva Decor Pearl Pens

Up next is the lovely and talented JENNY


Here is our complete line up for day #2 in case you get lost along the way:


Thanks so much for joining us for such a fun day! Happy Haunting!


Photobucket

Monday, September 8, 2014

Blog Hop Tour - Monday With Mama Lovebug


Hi Everybuggie!  It’s Pam aka Mama LoveBug here today to share a project and a little bit about me and my crafting for this Blog Hop Tour.

I was asked by Connie Wallenbrock to participate in this event and want to thank her for her crafty friendship and wonderful inspiration.  I have been a part of many of her blog hops and have greatly appreciated her organization and kindnesses along this crafting journey.  Connie has been an awesome asset in our LoveBug Creations Creative Team.  Visit Connie at HER BLOG

So what about me??
I started out with paper doll crafting, which is my all time passion from a youngster to my “veteran” status today.  My mom started me on the road to paper doll madness and these were some of my precious memories of her helping me learn to cut them out.  Over those years I saw the advent of punch out paper dolls, which never seemed to be my thing but yet at the age of 14 I had amassed a ton of dolls, clothes, houses, and accessories.

About the time I retired from teaching I got hooked on Sizzix paper doll dies – that’s where I started and had fun making my own creations with tons of paper, Peachy Keen faces, and of course the dolls.

Later I got into stamps and digi-stamps, which are loads of fun too – the same supplies were used – paper, dolls, scissors, dies, and imagination.  Lately I’ve discovered the joy of art journaling with stencils, sprays, and of course, paper dolls.

As a grandma I rarely see many paper dolls on the general market so I have the joy of adding to my arsenal of paper dolls and sharing these with my granddaughters and friends.  I love making cards, freestanding table décor, and greeting card tags in handmade boxes.  My choices are very eclectic from vintage to whimsical to modern – hey if it’s a doll paper I want to make something out of it.  Big shout-out to Julie Nutting and Dyan Reaveley!!

Confessions of my crafting:
1. I cannot draw a straight line without a ruler and have zero drawing skills.
2. I have a Cricut and a Cameo but I must confess I enjoy the old-fashioned joy of paper and scissors best.  Give me a stamp and I’m happy.
3. None of my creations are ever mass-produced.  I make each card, bookmark, tag etc as a one-of-a-kind (unless someone wants multiples). 
4.  When I started out doing this, I took card-making classes for about a year.  I appreciated all the techniques and products, but I found the cards I was learning to make in my opinion were same-old-same-old; I liken them to “little old lady cards” – pretty but not something I wanted to display or keep.  (See comment 3)
5. Aside from the paper dolls I get a lot of joy from actually making embellishments– I have a lot of dies!!
6. I am a paper hoarder.

Here's my project using two vintage lady stamps, sentiment, handmade flowers, a doily die, some LBC rumple ribbon, Graphic 45 paper, and a few pearls to create a tag-greeting card in a handmade box; it has a magnet on the back so it can be hung.


I asked my dear friend Stephanie Eaken to be my plus one on this blog tour.  Stephanie will be posting next Monday, September 15, so please go to her blog and leave her a love note!  Stephanie has been an a joy to know and craft with as a DT for LoveBug Creations.  She is always, always prepared, willing to give 110%, positive in her dealings with others, and innovative with her talent.  Stephanie is the kind of gal that I’d love to spend time with; unfortunately, we have never met face-to-face, but I hold her cyber friendship close to my heart.

Stephanie Eaken at Bits and Pieces (and Scraps)  HER BLOG

Remember no matter how you bunch your blooms, rumple your ribbon, and piece your paper, have fun with it..............cyberhugs........Mama LoveBug


Photobucket

Monday, June 9, 2014

Happy Almost Birthday to Melissa!!

Welcome to the first day of our new CT presentations!  I am so excited to craft with the lovely ladies whose names and blog links are found on the right side of our blog - give them a shout-out!!

Happy Birthday to our daughter, Melissa - she'll be celebrating her big event on June 10!  Mama LoveBug here to share my birthday greetings with you.  Birthdays are so much fun to craft and share.  I really enjoy creating something that I hope will stand the test of time and be appreciated as a sincere expression of love!


Ok, so you know I love, love, love paper dolls and I bought a set of stamps, Janie's Paper Dolls from Paper Wishes, that has multiple girls of varying sizes.  I stamped this one three times - one for body, one for hair, and one for dress.  I then fussy cut and pieced together this gal as my focal point. Before I adhered her to the card I adhered this lovely to a piece of cardboard and cut the whole thing out again - I do this to make a sturdier doll that won't fall off or come apart.

I next used LoveBug Creations Mama's Mesh (pinky/purple HERE) and an LBC large hot pink Beautiful Bloom HERE.  The hand-dyed mesh gives such wonderful texture and the bloom is so light-weight but dynamic in it's presence plus the blooms come in different sizes to accommodate your crafting needs!

The coordinating card base was from Stampin UP as well as the next dry embossed mat with xoxox.  I had a new script stamp that fit well as the next layer.  My birthday sentiment was from my stamp stash.  I finshed this off with a bit of gel-pen accenting.

Remember no matter how you bunch your blooms, rumple your ribbon, and piece your paper, have fun with it...............cyber happy crafting............Mama LoveBug

Photobucket

Monday, June 2, 2014

Mama LoveBug's Mama - It's Your Birthday!!

It's your birthday, mama and so happy you are celebrating 92 years of living!!  
This is Mama LoveBug here today to say............Happy Birthday to my Mama!!

Mama's Rose and Peach Blossom from the Southern Sass LoveBug Creations Rumple Ribbon HERE
 are two of the ingredients in my tag greeting card in a box - mine has magnets on the back so it will adhere to a mirror for my mom!!

Add to this a straw, a big SVG flower, some lovely sentiments, and a paper doll (Janie's Dolls from Paper Wishes) and lots of love for Mom.

When I was a very little girl my mom introduced me to the joys of paper dolls - we would spend lots of time cutting them out by hand and dressing them up.  My long-standing love for all things paper doll has grown from that.  For this doll I stamped her three times to get the skin tone, the dress, and the hair from various papers and then I pieced her together.  When the project was finished, I sprayed it with Goosebumps Shimmer Spray for some sparkle and shine.  I added the magnet to the back and voila - my project for today.

Remember no matter how you bunch your blooms, rumple your ribbon, and piece your paper, have fun with it................happybirthday..........Mama LoveBug

Photobucket

Saturday, March 1, 2014

Lucky You! Lucky Me! - New LBC Rumple Ribbon Collection

Mama LoveBug here with some fun ways to use 
LoveBug Creations new Rumple Ribbon collection
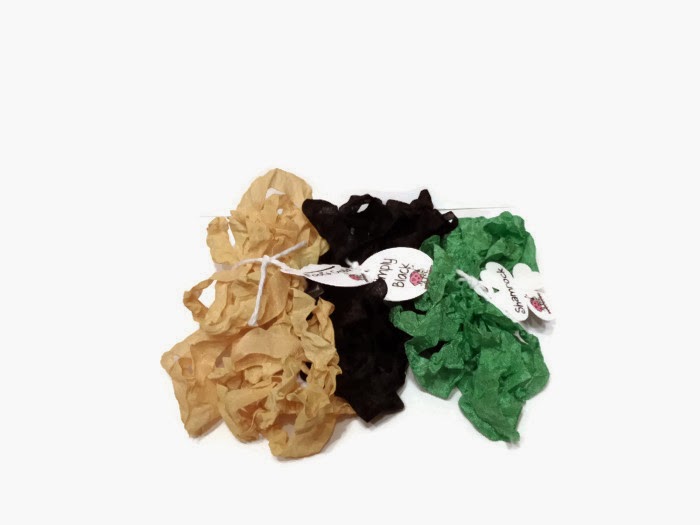
I loved working with Shamrock, Fool's Gold, and Simply Black.  


First of all, I know treat containers and treat holders are always a hit with crafters and even though I have a Cameo I still enjoy using a 6 x 6 piece of paper, scoring it, housing a candy bar (I used a Kit Kat), and then after adhering with double-sided tape, I got out my crimper for the edges!  "I'm crimping, I'm cutting" was a little song I made up doing this with my granddaughter, Savannah - we had so much fun!  It wouldn't have been the same by just using a machine.  After assembling the candy bar packet, I used
  LoveBug Creations new Rumple Ribbon - Shamrock for the top bow and a strip of Simply Black running underneath the shamrocks in the center for that extra touch - 
The darling hippo was from the Silhouette store and the sentiment and shamrock dies are from Jaded Blossom.


For my next two projects I designed The Tag - The New Greeting Card.  These tags both have a Julie Nutting paper doll - the first is using a stencil (and a matte look) and the second is a stamp (and a shinier, sparkle look).  Lots of details for these tags make them worthy of being on display so ink your edges, cut your paper, stamp and/or cut out your focal points, arrange the elements, and don't forget to use 
LoveBug Creations new Rumple Ribbon - Shamrock, Fool's Gold, and Simply Black!!
Additional elements used on these tags were cute hippo and darling bear from the Silhouette store, Jaded Blossom dies, a candy heart die, straws, stars, and some bling.


One further note -on the second tag I used a LoveBug Creations Beautiful Bloom for more texture and interest - remember it's the little touches that add so very much to your handmade creations!!

Hi Every-buggy!!!!
Kimi here to share my two projects with you!!
I wanted to make some St. Patty's Day Treats and I love how they turned out!!!
So here's the first one: A Yummy Pot Of Gold

 
For this one I used the following:
Jaded Blossom- Lucky Charm Stamp Set & Mini Tag Dies
CS from my Stash
SVG file from Silhouette Store for the Pot
 
 
And here's my 2nd project: A Yummy Treat Bag

 
For This I used the following:
Jaded Blossom- Lucky Charm Stamp Set, Mini Tag Dies & Clear Purses


AND Lucky you....There's a sale going on starting today and going til Monday!!! Save 25% on ANY purchase by using coupon code- LUCKY (all capital letters!) at check-out!!! Click here for some Happy shopping!!!


Photobucket

Saturday, March 9, 2013

Connie Can Crop Birthday Blog Hop


Looking for the Gorgeously Green Blog Hop - click HERE


Welcome to Connie Can Crop's Birthday Blog Hop with Connie and her craftastic friends.  If you hopped over from  Mary you are on the right path but if you happened upon this hop and want to begin with our birthday blog hostess zip over to Connie

Happy Birthday Connie – I see you have blog candy to celebrate your special day. For this one-day hop you hoppers have a chance (until 9 PM on Sunday) to win if you
1. Become a follower of each blog (if not already)
2. Leave each crafter a love note
3. Head over to Connie’s blog and post that you followed the hop rules at Connie Can Crop

Wow, that blog candy is yummy!
My Tilly Teacup double-sided stand up card (a sweet digi from Sherri Baldy) invites you to settle back and enjoy the crafty parade of birthday treats.


The premise of the hop is to celebrate all things birthday-related so with that in mind I made a triple stamped paper doll birthday card in honor of our hostess.

Recipe
*Sizzix Paper Doll die for doll, hair, and dress - glossy accent for the hair
*Stampin Up cardstock and ink
*Stamped images and sentiment from my stash
*Green Stickles - love them!!
*LoveBug Creations Rumple Ribbon to top off the b-day gal found at LBC Rumple Ribbon

Remember no matter how you piece your paper and rumple your ribbon, have fun with it..........cyber-birthday hugs.........Mama LoveBug

I'm entering this card in the All That Stickles Linky Party

Let's see what birthday surprises Michele has at her spot.


Photobucket

Sunday, February 10, 2013

Angela's 30th B-Day Blog Hop


Welcome to Angela's 30th B-Day Blog Hop.  If you hopped over from Jennyfer you're on the right path, but if you just stumbled upon this and want to begin at the start spot of our blog hostess and birthday gal, then hop over to Angela
Happy Birthday, Angela, - a sweet cyber friend!  I spy blog candy along the way too!!

The Sizzix Big Kick came out to make one of my all time favorites for this hop - the paper doll complete with Sizzix faces.  Since Angela's birthday is a wintry time, I chose some winter clothing for the dolls - and I also dusted off my crimper to give a bit of dimension to the clothing and used Glossy Accent for each doll's hair.  Each sweet friend was topped off with a bow made from our LoveBug Rumple Ribbon. Both triple-stamped doll cards show different shades of red. The other items I used are all SU products - cardstock, stamps, and ink. The center panel is Kraft paper.  The glitz is Stickles - love those!   Hope your birthday is super, Angela!!!


I am entering these dolls in the All That Stickles Challenge - using Christmas Red Stickles


Remember no matter how you piece your paper and rumple your ribbon, have fun with it........cyberbirthday blessings.........Mama LoveBug.

For our next hop site go to Lisa W
Photobucket